Resolve Documentation
Complete guide to installing, configuring, and using Resolve to automatically fix warnings in your Revit models.
Supported Revit Versions
- Revit 2022
- Revit 2023
- Revit 2024
- Revit 2025
- Revit 2026
- Revit 2027
Installation
Make sure Autodesk Revit is completely closed before starting the installation process.
.exe file and follow the installation wizard. Accept the licence agreement to complete the installation.Quick Start Guide
Follow these steps to fix your first warnings with Resolve:
Open Resolve
With your Revit project open, navigate to the Add-Ins tab in the ribbon and click on Resolve in the AUTOM8LABS panel. The main dialog window will open.
Navigate to a Warning Tab
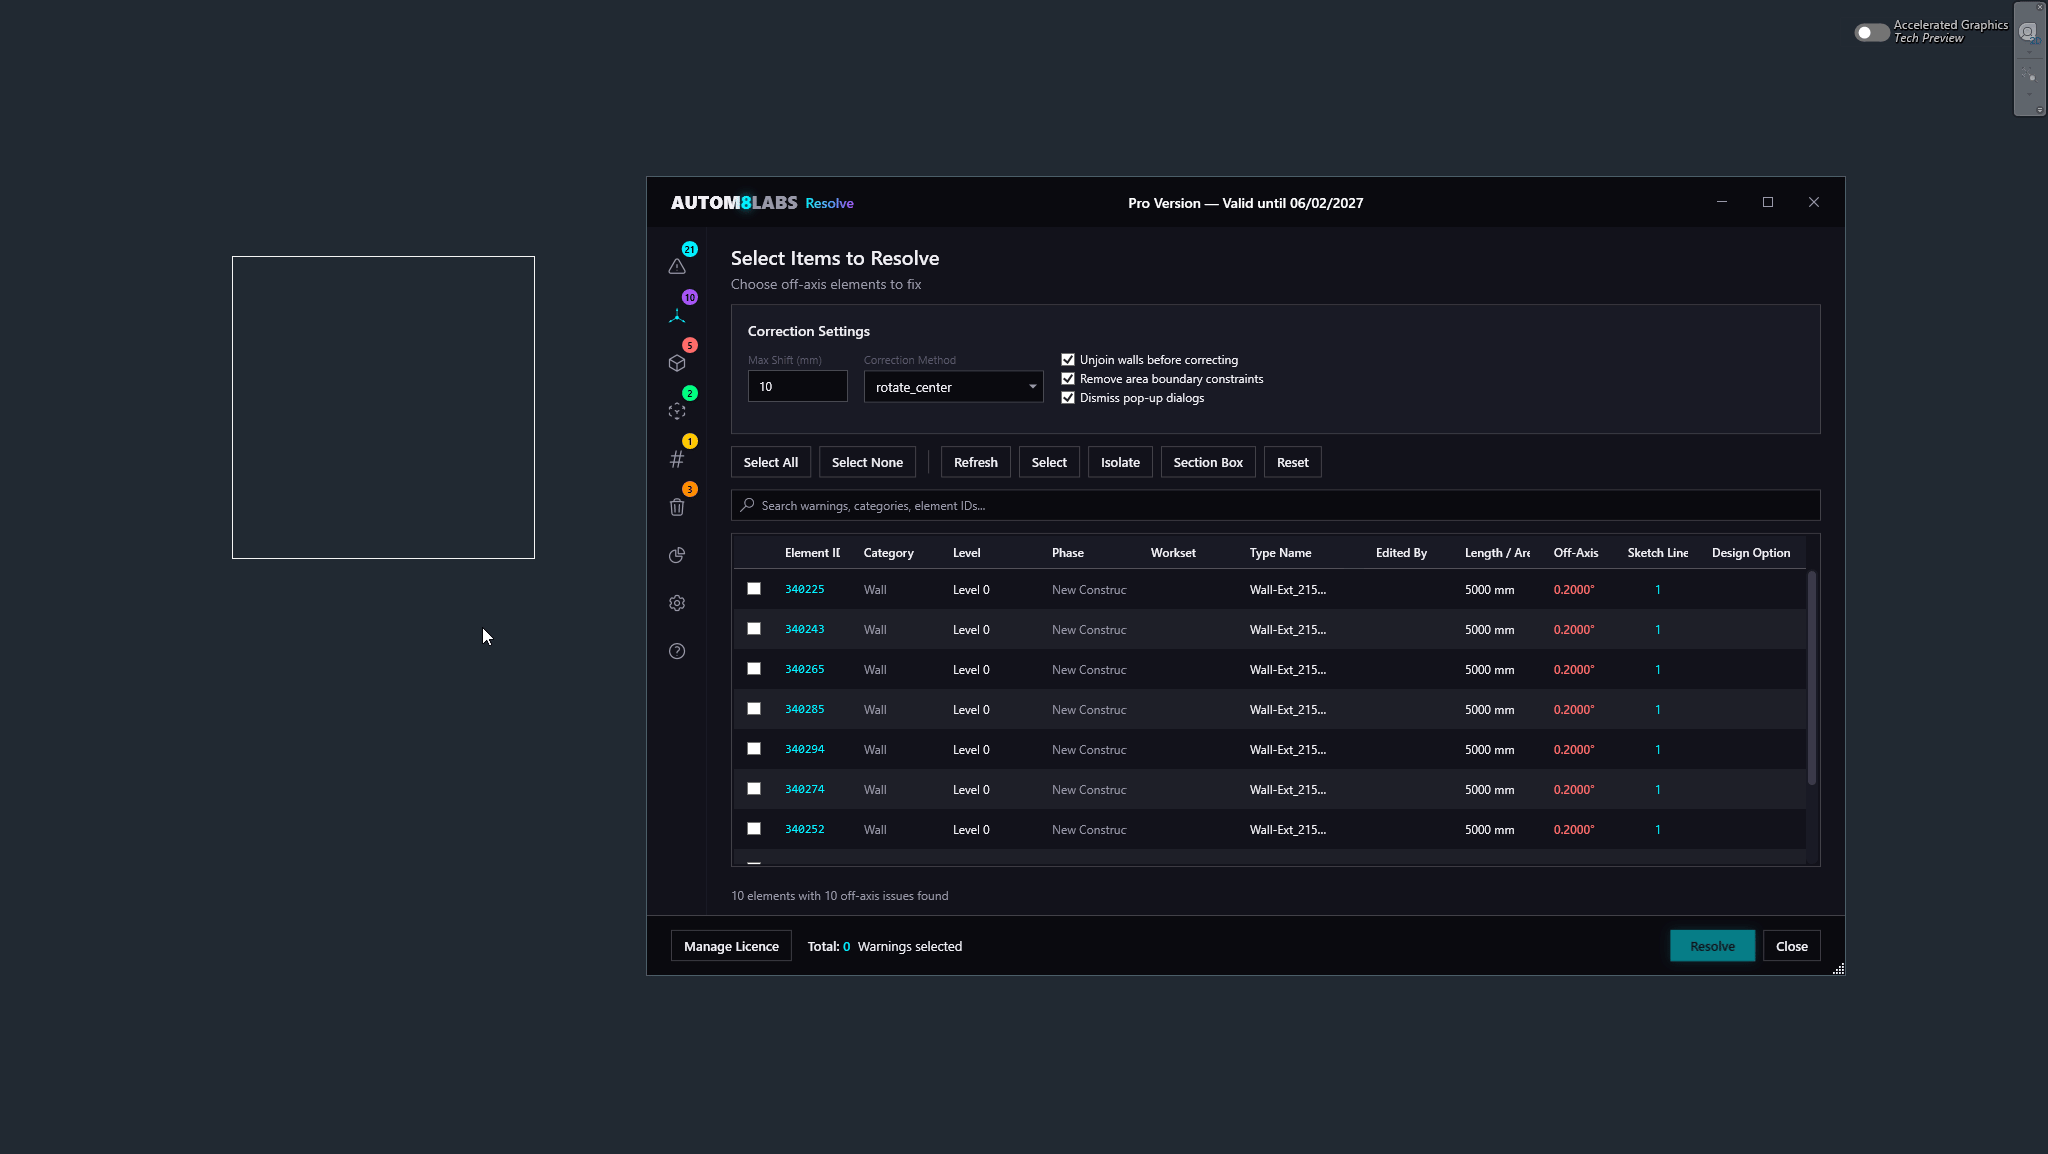
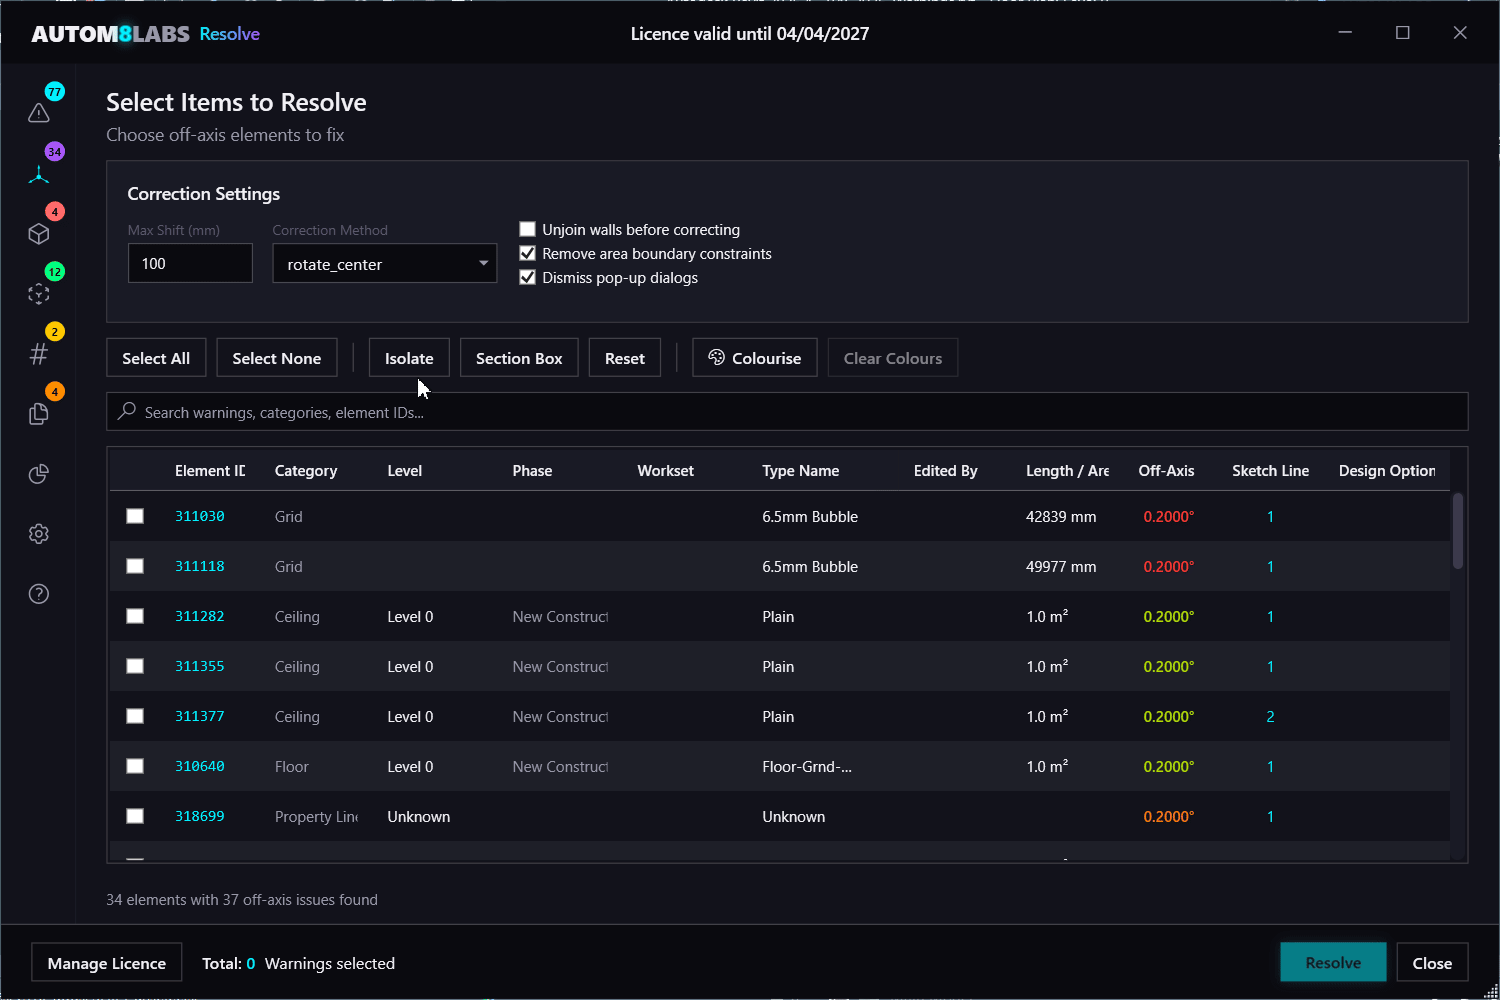
Select a warning tab, such as Off-Axis, to view warnings of that type in the datagrid.
Review Warnings
Inspect the warnings listed in the datagrid. Use the selection controls to choose which warnings to resolve.
- Select a warning in the datagrid to highlight the affected elements in the model
- Click Isolate to isolate the elements in a 3D view so you can visually inspect them before resolving
- Use Section Box to zoom into the affected area for a closer look
- Select individual warnings or use Select All to batch-resolve in one click
Resolve Warnings
Click Resolve to fix the selected warnings. A progress dialog will track the operation.
Use Isolate and Section Box to visually inspect warnings before resolving. The entire operation supports single undo (Ctrl+Z), so you can always revert.
All Warnings
The All Warnings tab provides a comprehensive read-only inventory of every warning in your Revit model. Use it to search, sort, and navigate to warning elements without making any changes.
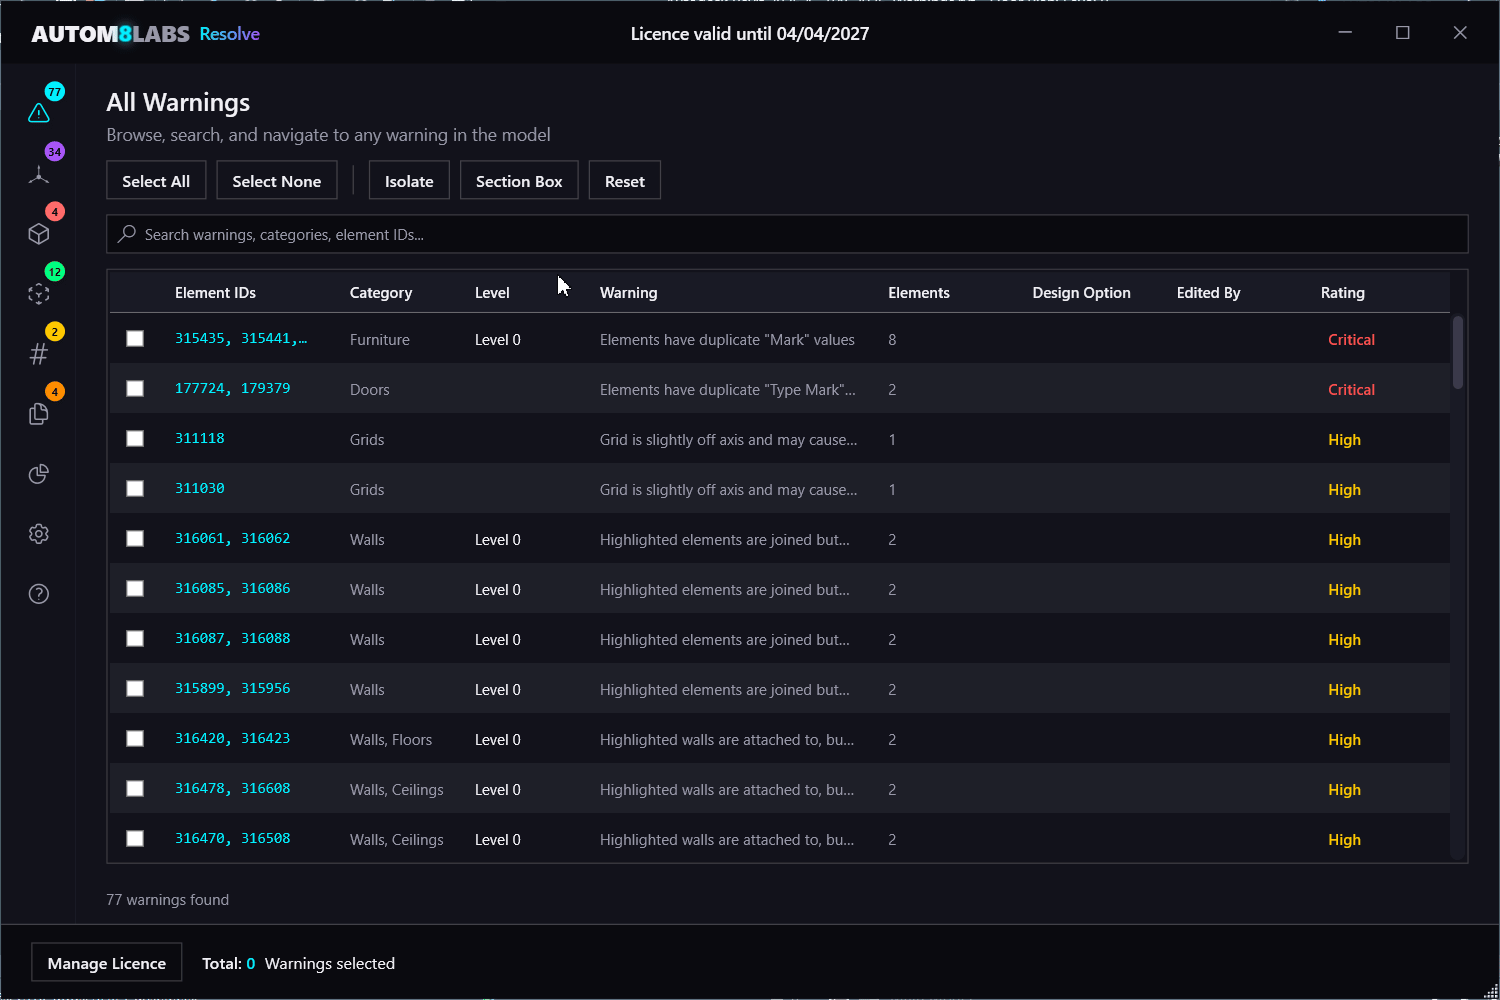
Features
- Full-text search — quickly filter warnings by description text
- Sortable columns — sort by type, category, element ID, level, and more
- Select in View / Isolate / Section Box — navigate directly to warning elements
- Reset — reset the current view from Isolate and Section Box back to its original state
- Custom Ratings — assign severity ratings to warning types for prioritisation
Off-Axis
The Off-Axis tool detects and corrects elements that are "slightly off axis" — a common Revit warning caused by imprecise placement or imported geometry. It handles both sketch-based elements and direct (non-sketch) elements.
Why Off-Axis Warnings Matter
Off-axis warnings are one of the most common — and most tedious — issues in Revit models. They creep in from:
- CAD imports where coordinates carry floating-point imprecision
- Copy/paste drift between linked files
- Linked file misalignment across project origins
- Years of modelling by multiple team members
Left unchecked, they pile up into the hundreds or thousands. They clutter the warnings dialog, mask more serious issues, and make model audits painful. They also cause real workflow friction — off-axis walls and lines won't snap to dimensions cleanly, forcing you to TAB to individual endpoints just to place a dimension string. A high volume of warnings also slows down opening, saving, and syncing, and can cause file corruption.
Some elements in a Revit model are intentionally off-axis — particularly in existing buildings where as-built geometry doesn't align to a regular grid. Resolve never fixes anything without your input. Use Isolate and Section Box to visually inspect each warning in 3D, select only the elements you want to correct, and leave intentional geometry untouched.
Minimum Intervention
Resolve only removes floating-point noise. A wall at 89.997° gets snapped to 90°. A wall intentionally set at 45° stays at 45°. Nothing visibly moves — and you control exactly how much shift is acceptable using the Max Shift setting in the Correction Settings panel.
Supported Element Types
- Walls
- Room Separation Lines
- Area Boundary Lines
- Model Lines
- Detail Lines
- Grids
- Reference Planes
- Curve-Based Families
- Property Lines
- Floor Sketch Lines
- Ceiling Sketch Lines
- Wall Profile Sketch Lines
- Roof Sketch Lines
- Shaft Opening Sketch Lines
- In-Place Family Sketch Lines
- Massing Sketch Lines
How Corrections Work
- Scan — enumerate all elements with off-axis warnings
- Analyse — measure the angular deviation from the nearest cardinal or project axis
- Safety Check — verify the deviation and endpoint shift are within configured thresholds
- Correct — rotate or adjust the element to align with the target axis
- Optimise — rejoin walls and clean up connections where applicable
- Verify — re-scan to confirm the warning has been resolved
Resolve processes direct elements first, then sketch hosts, then sketch lines — because straightening a wall's location line often clears its sketch warnings too, maximising first-pass success.
Run Resolve again after each pass — some corrections reveal new fixable issues that were previously hidden by other warnings.
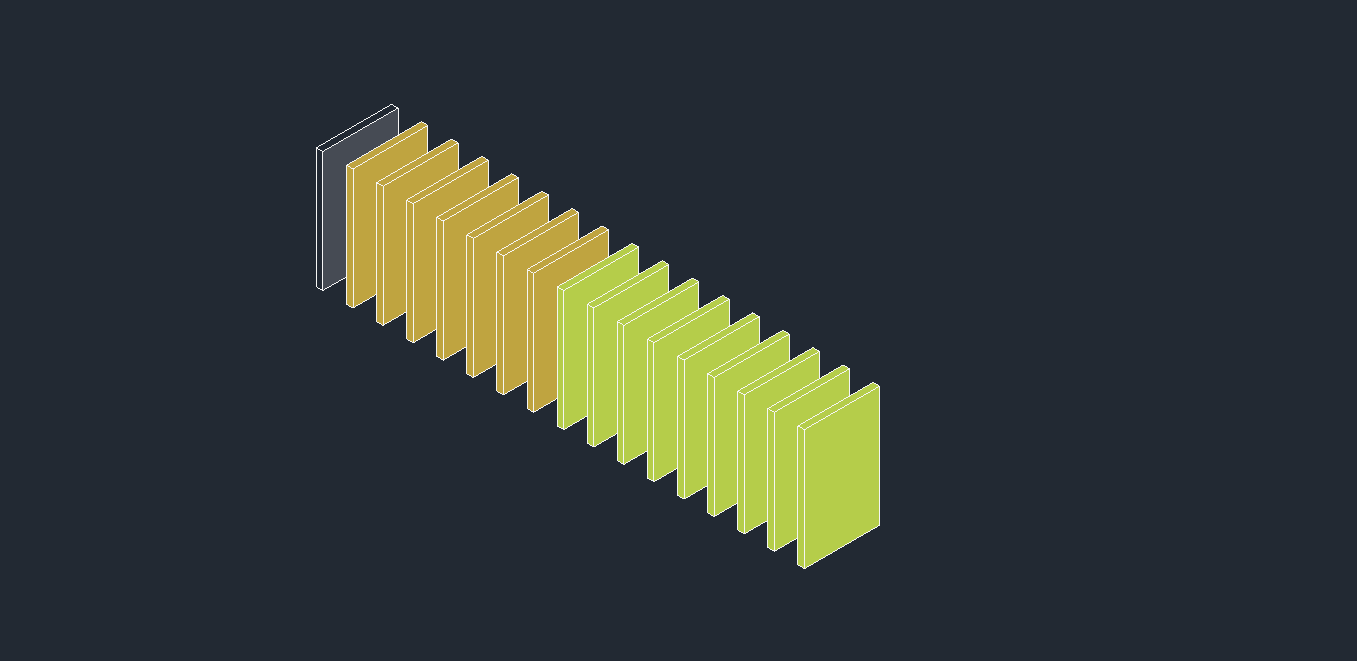
Colourise by Deviation
Use the Colourise feature to paint elements by their angular deviation, creating a visual heatmap of off-axis severity:
- Green (0-1mm) — minimal deviation, safe to correct
- Yellow-Green (1-3mm) — minor deviation
- Amber (3-10mm) — moderate deviation, review recommended
- Orange (10-25mm) — significant deviation
- Red (25mm+) — large deviation, manual review advised
In-Place Family and Massing sketch lines require a manual step after Resolve corrects them. Select the element, click Edit In-Place (or Edit for masses), then immediately click Finish. This commits the corrected geometry and clears the warning — no manual editing needed, just open and close the editor.
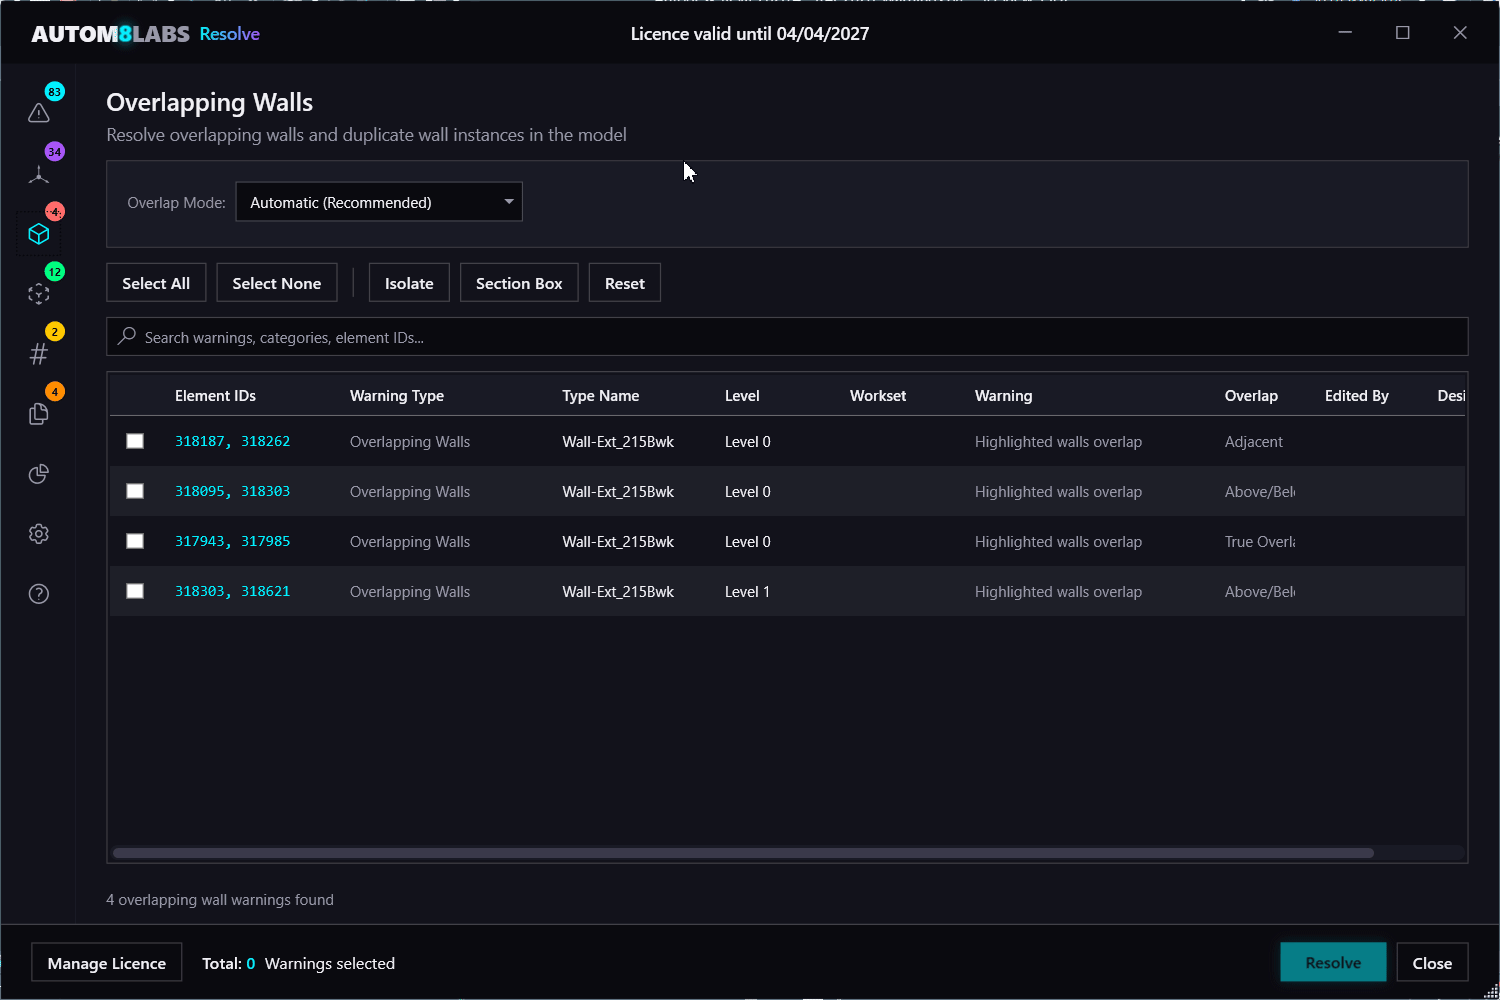
Overlapping Walls
The Overlapping Walls tool detects walls that occupy the same space and provides multiple resolution strategies to fix them.
Overlap Mode
- Automatic (Recommended) — intelligently selects the best strategy per overlap type: deletes true overlaps, trims or adjusts above/below overlaps, and skips adjacent/partial pairs that need manual review
- Delete Shorter/Newer — removes the shorter or more recently created wall from the overlapping pair
- Solid-Solid Cut — applies a solid-solid cut between the overlapping walls
- Join Geometry — joins the geometry of the two walls
- Adjust Offsets — adjusts wall base or top offsets to eliminate the vertical overlap without deleting either wall
Overlap Types
- True Overlap — walls with coincident location curves, same endpoints, same type, and same level
- Above/Below — collinear walls that overlap vertically across different elevation levels
- Partial — collinear walls on the same level but with different endpoints or types
- Adjacent — side-by-side walls with different location curves (automatically skipped — not true overlaps)
Split Walls by Level
The Split Walls by Level sub-feature splits multi-level walls at level boundaries, which can resolve overlapping wall warnings caused by walls that span multiple levels. Only basic walls are eligible — curtain walls and stacked walls are excluded.
Adjacent and partial overlaps are automatically skipped in Automatic mode — they need manual review as joining or deleting won't resolve the underlying issue.
Detach
The Detach tool resolves warnings caused by elements that are joined or attached to other elements they no longer intersect. It automatically unjoins or detaches these elements to clear the warnings.
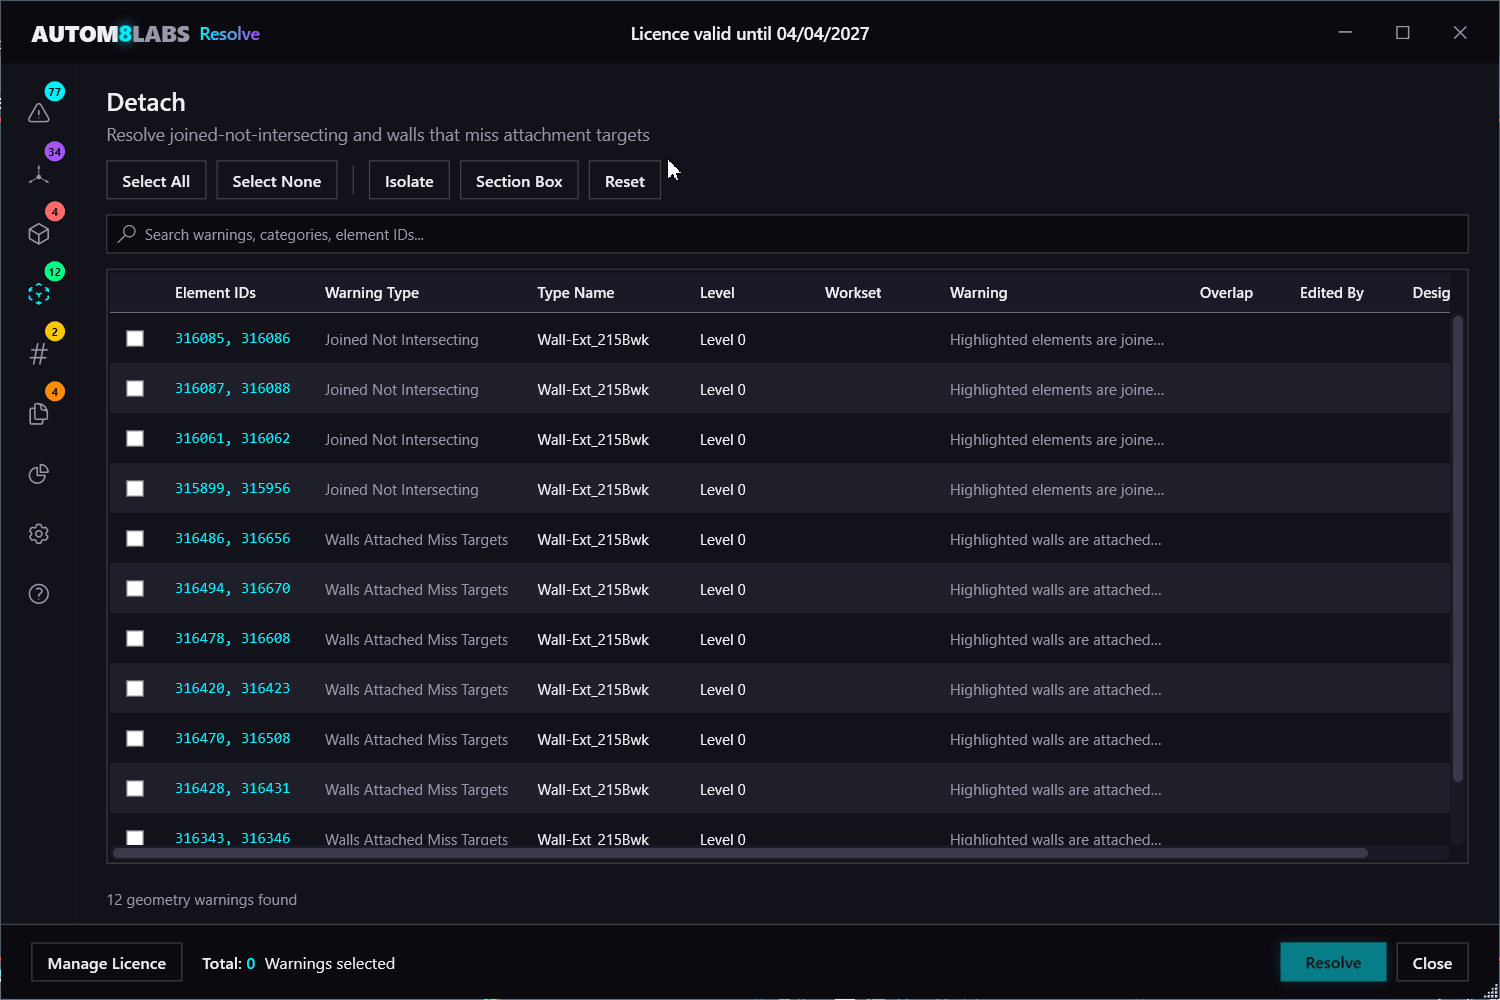
Warning Types Handled
- Joined But Not Intersecting — elements that are joined in the model but no longer physically overlap
- Walls Attached But Miss Targets — walls attached to floors, roofs, ceilings, or other walls that no longer reach their attachment targets
Preserve Unconnected Height
Resolve captures each wall's physical height before detachment, then restores it afterwards by setting the top constraint to "Unconnected" and applying the original height. This prevents walls from springing to unexpected heights after their attachment target is removed.
The Detach tool requires Revit 2025 or later. It uses the Wall.RemoveAttachment API introduced in Revit 2025.2 to safely detach walls from their targets.
Duplicate Marks
The Duplicate Marks tool detects elements that share the same mark or number value and provides options to renumber or clear them.
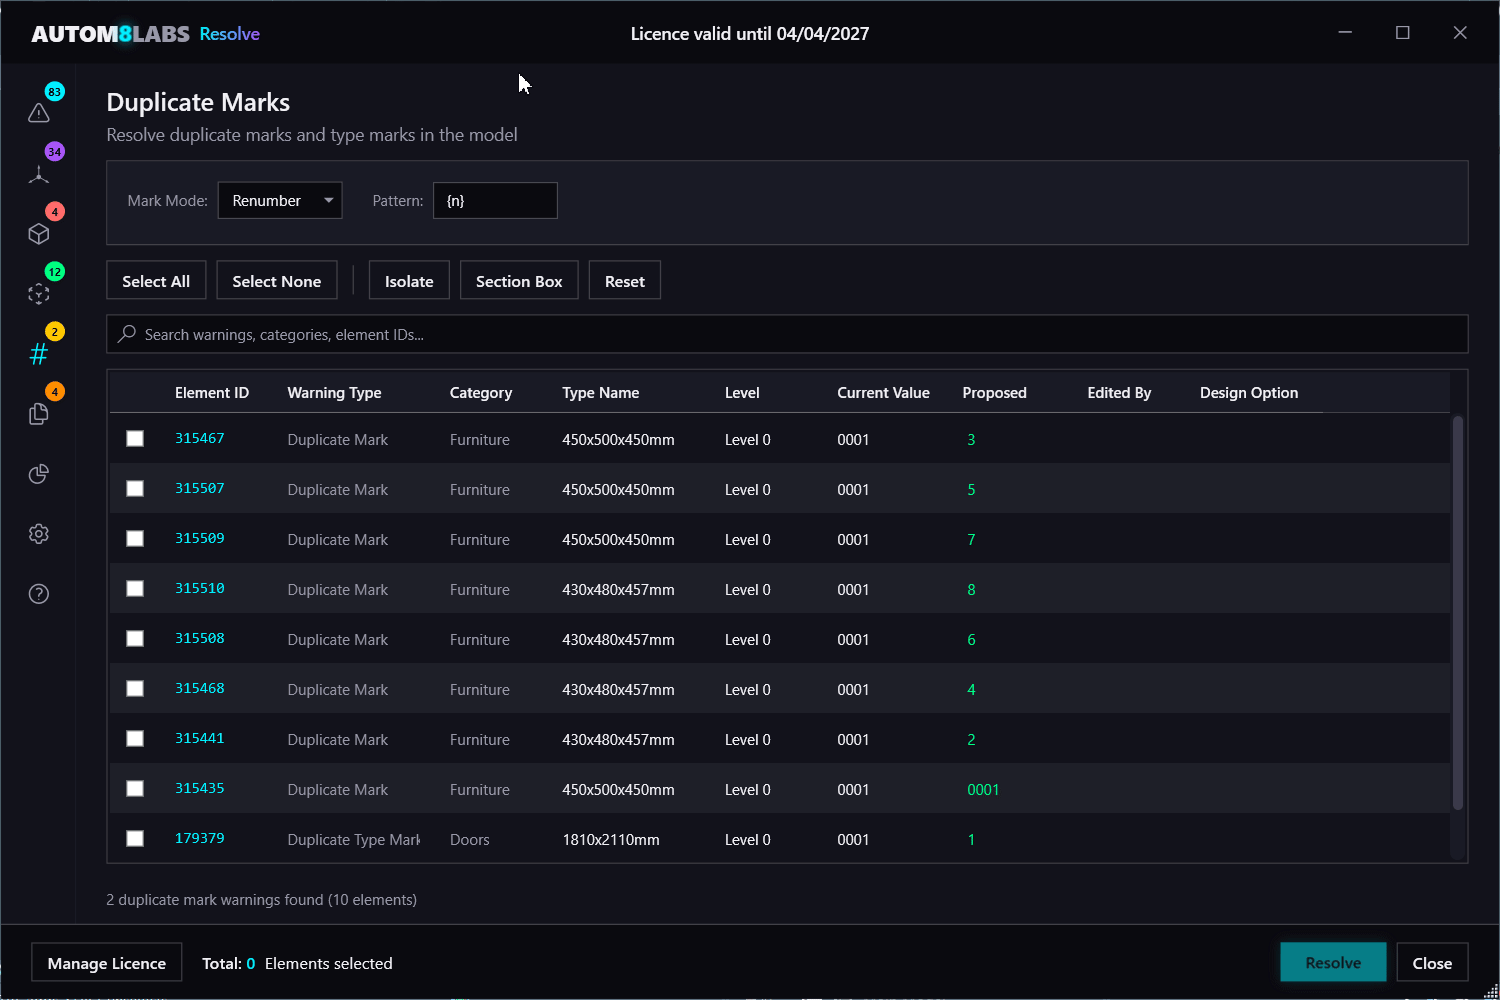
Warning Types Handled
- Duplicate Mark — multiple element instances sharing the same Mark parameter value
- Duplicate Type Mark — multiple types sharing the same Type Mark value (affects all instances of that type)
- Duplicate Number — rooms or areas sharing the same Number value
Modes
- Renumber — assigns new unique values using a configurable pattern. The element with the lowest ID is treated as the original and kept unchanged
- Clear — removes the mark/number value from duplicate elements, keeping the original
Renumber Pattern
The pattern field uses the {n} token as a placeholder for the sequential number. You can combine it with a prefix or suffix to match your project's naming convention — for example, DESK-{n} produces DESK-1, DESK-2, etc.
Zero-padding is controlled by the separate Padding setting (e.g. padding of 3 produces 001, 002, etc.). The start number is configurable, and numbering can be scoped per-group (restarts for each set of duplicates) or global (continuous counter across all groups).
Identical Instances
The Identical Instances tool detects elements that are stacked directly on top of each other — identical elements placed at the same location. It removes the duplicates while preserving one instance.
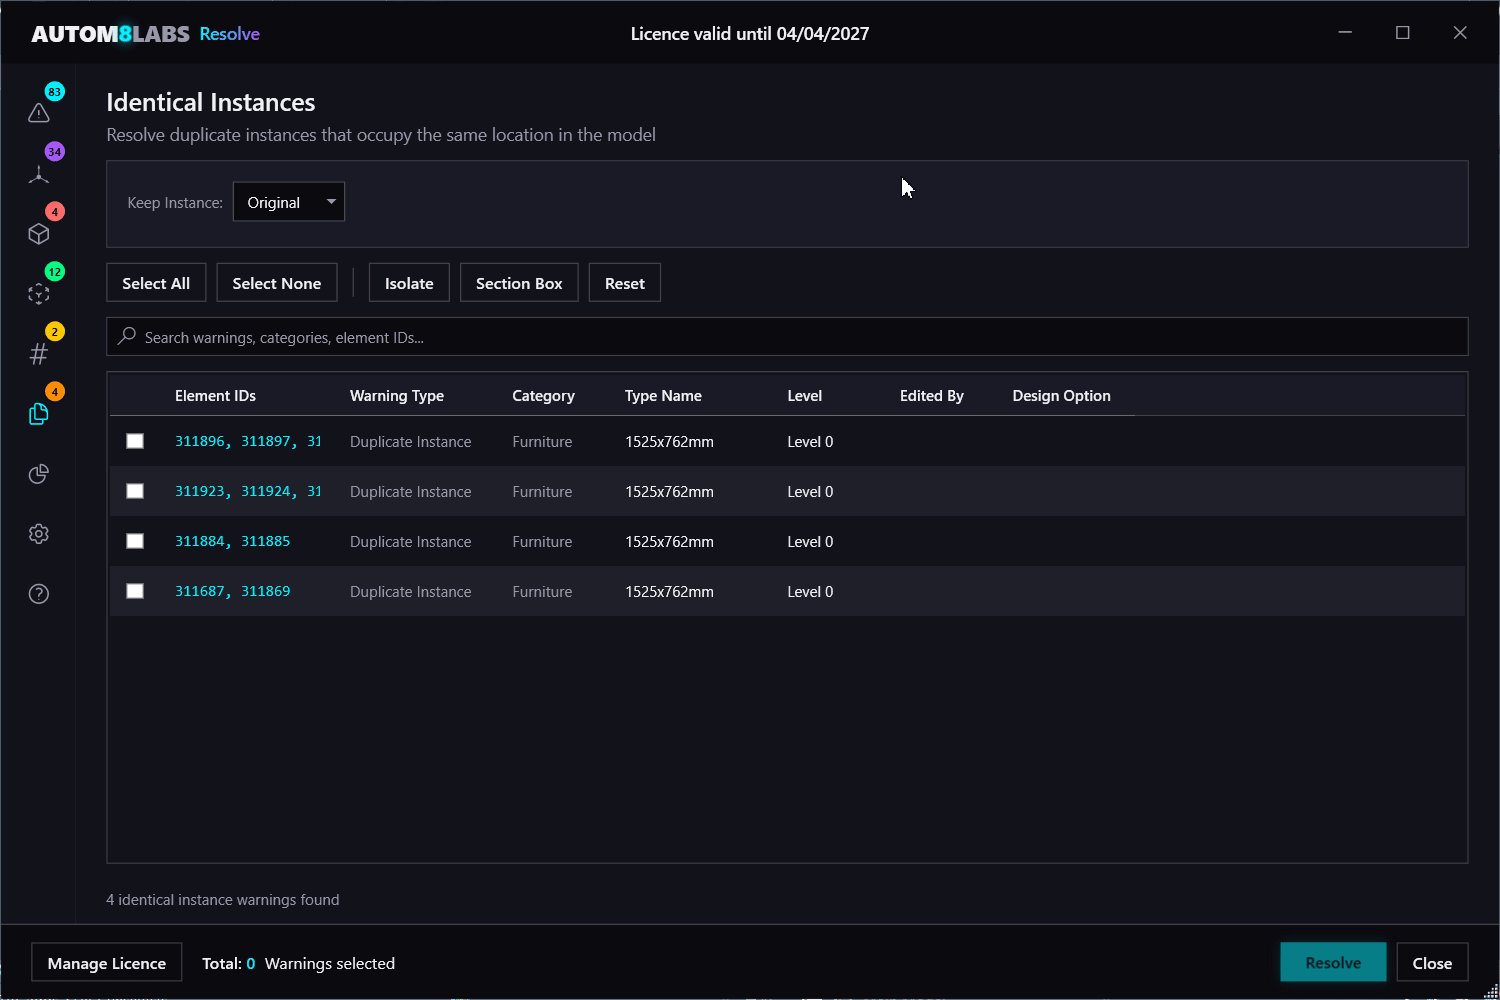
Retention Options
- Keep Original — retains the element with the lowest element ID (the first placed)
- Keep Newest — retains the element with the highest element ID (the most recently placed)
Dashboard
The Dashboard provides a high-level overview of your model's warning health. It computes a health score (0-100) based on the number and severity of warnings, and displays charts, trend sparklines, and warning diffs to help you track progress over time.
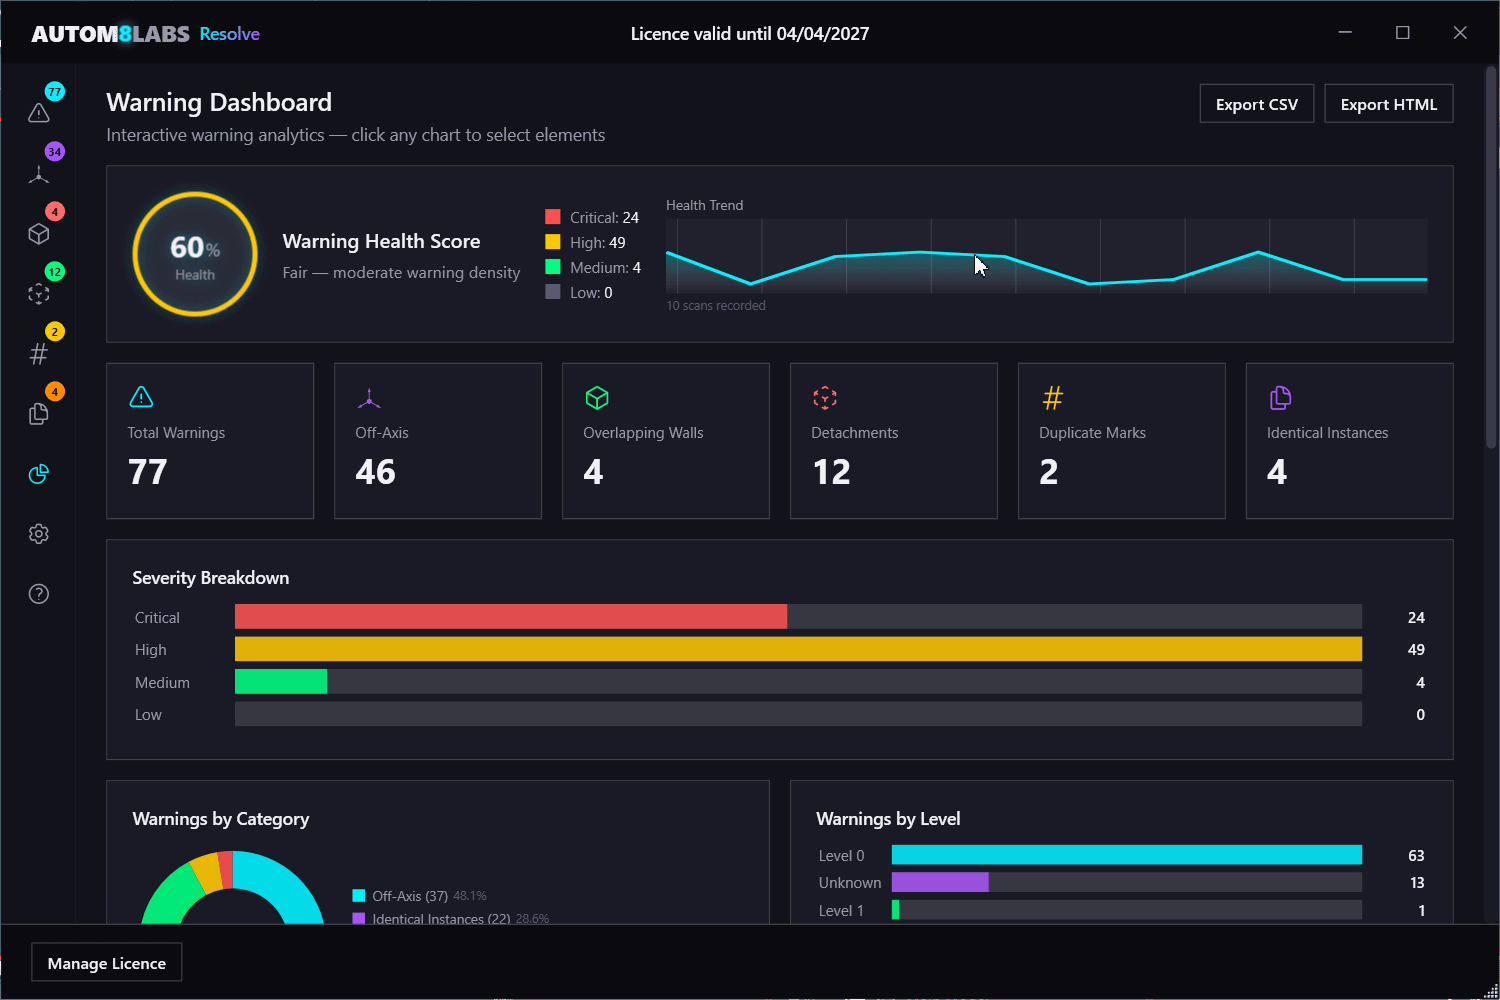
Features
- Health Score — a computed 0-100 score reflecting overall model warning health
- Charts by Type, Category, Severity, Level, and Workset — visual breakdowns of warnings
- Top Warning Elements — elements generating the most warnings
- Trend Tracking — sparkline showing health score changes over time
- Ownership Breakdown — warning counts by element owner (workshared models)
- CSV/HTML Export — export dashboard data for external reporting
Health snapshots are saved to %LocalAppData%\AUTOM8LABS\Resolve\History\ for long-term tracking.
Selection & View Controls
All warning tabs share a common set of selection and view controls. Selecting elements in the Revit model automatically selects the corresponding warnings in Resolve, and vice versa — so you can click on an element in a view and immediately see its warning details, or select warnings in the datagrid and have them highlighted in the model. This two-way selection makes it easy to isolate problem areas in a 3D view, visually review them, and then choose exactly which ones to resolve.
- Select All / Select None — quickly select or deselect all items in the datagrid
- Select in View — highlights the selected elements in the active Revit view
- Isolate — isolates the selected elements by hiding all other elements in the view
- Section Box — creates a section box around the selected elements for 3D navigation
- Reset — restores the view to its original state (removes isolation and section box)
Results Grid
The results grid is the central datagrid used across all warning tabs. It provides a consistent interface for viewing, filtering, and acting on warnings.
- Per-row checkboxes — select individual warnings for resolution
- Full-text search — filter results by typing in the search box
- Sortable columns — click column headers to sort ascending/descending
- Double-click navigation — double-click a row to zoom to the element in the active view
- Right-click context menus — access additional actions per element
- Dimmed rows — rows are dimmed when the element exceeds the configured correction threshold
Batch Processing
Resolve processes warnings in batch, providing feedback and control throughout the operation.
- Progress Dialog — real-time progress bar showing current element and total count
- Pause / Cancel — pause or cancel the operation at any time
- Single Undo — the entire batch operation is wrapped in a single undo transaction (Ctrl+Z)
- Automatic Re-scan — after processing, the datagrid automatically refreshes to show remaining warnings
- Badge Counts — tab badges update to reflect remaining warning counts
- Failure Isolation — individual element failures do not stop the batch; failures are logged and reported at the end
Export
Export warning data from any tab for external reporting and audit purposes.
- CSV Export — exports all visible columns with a summary header including model name, date, and warning counts
- HTML Export — generates a styled, self-contained HTML report suitable for sharing with project stakeholders
Settings
The Settings tab allows you to configure Resolve's behaviour across all warning tools.
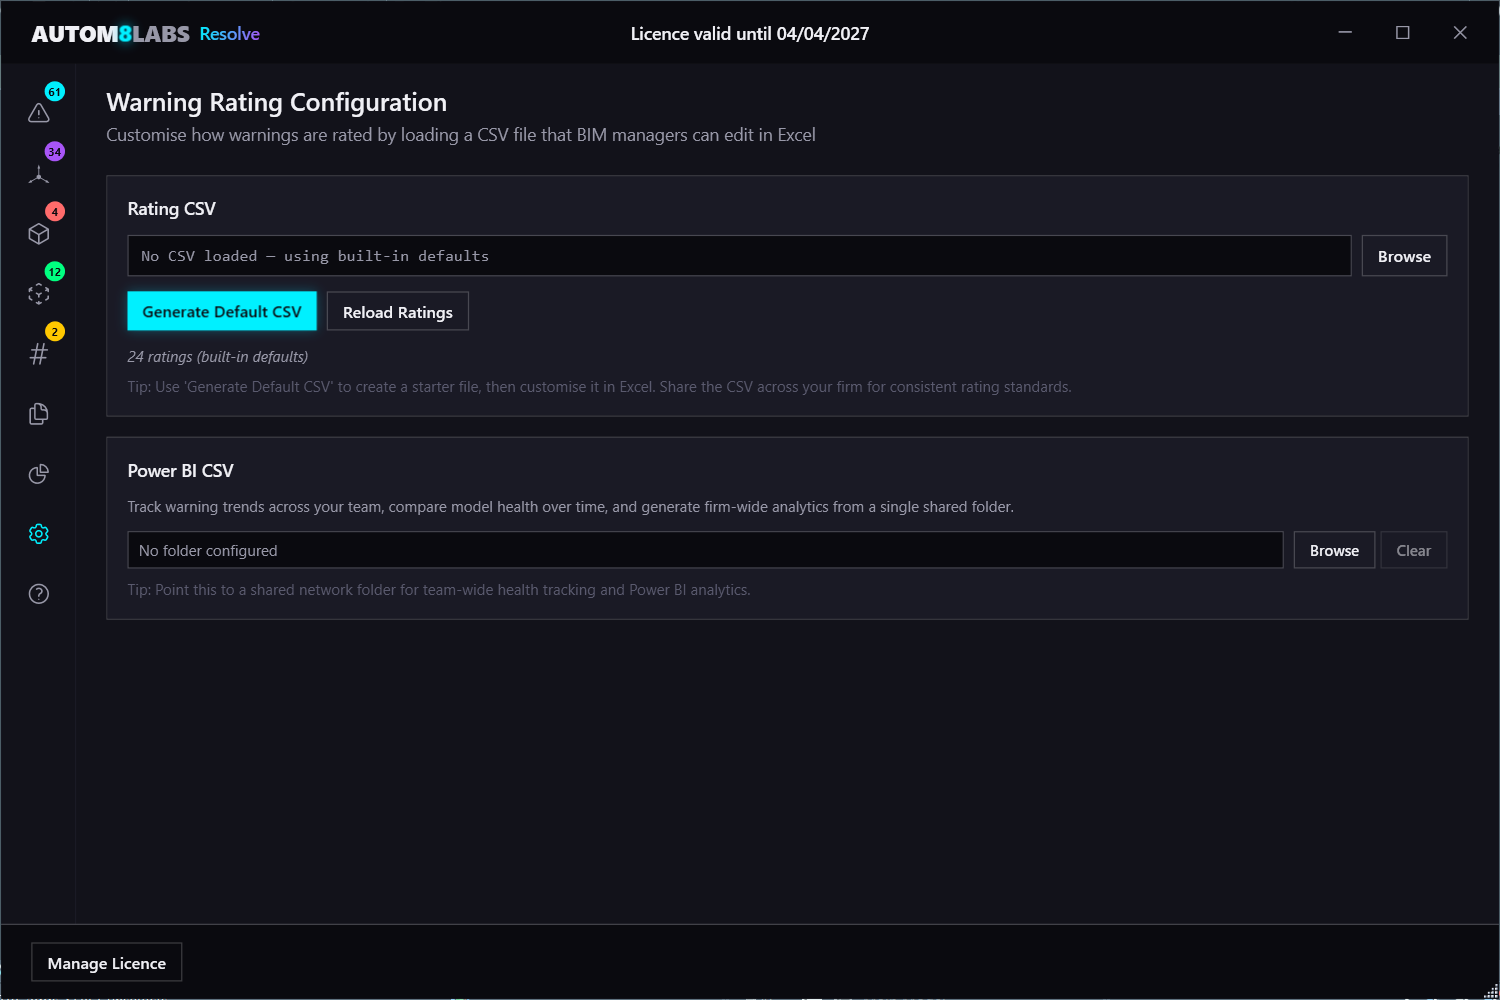
Warning Ratings
Configure custom severity ratings for warning types by loading a CSV file. Ratings are used in the Dashboard health score calculation and to prioritise warnings in the All Warnings tab.
Shared Health History
Set a shared network folder for health snapshots so the entire team can track model health over time from a central location.
Licensing
Trial (Free)
Resolve is free to download and use in trial mode. Trial includes:
- 10 warning resolutions per month across all warning tools
- All Warnings inventory with full search and sorting
- Navigation tools: Select in View, Isolate, Section Box
Paid Licence
A paid licence unlocks:
- Unlimited warning resolutions
- Dashboard with health score, charts, and trend tracking
- CSV and HTML report exports
- Shared Health History for team-wide tracking
- Colourise by Deviation heatmap
Troubleshooting
Resolve doesn't appear in Revit
If Resolve is not visible in the Add-Ins tab:
- Ensure Revit was completely closed during installation
- Verify the installation folder contains the required files
- Try reinstalling Resolve with administrator privileges
Elements not correcting
If elements are being skipped during Off-Axis correction:
- Check the Maximum Endpoint Shift setting — increase it if elements exceed the threshold
- Enable Remove Constraints if dimensional constraints are locking the element
- Use Isolate or Section Box to visually inspect problem elements
Workshared models
Resolve automatically checks out elements as it processes them. However, when resolving a large number of warnings it's best to have all other users close the model beforehand.
Log Files
Resolve writes detailed logs to:
%LocalAppData%\AUTOM8LABS\Resolve\Log\
Include these logs when contacting support.
Frequently Asked Questions
No. The entire resolution operation is wrapped in a single undo transaction. You can revert all changes with a single Ctrl+Z (Undo) immediately after the operation completes.
Resolve handles five categories of warnings: off-axis elements, joined but not intersecting, overlapping walls, duplicate marks, and identical instances (including wall attachment warnings).
Yes. Resolve automatically checks out elements as it processes them. For large batch resolutions, it's best to have all other users close the model first.
Trial mode allows 10 resolutions per month. A paid licence unlocks unlimited resolutions, the Dashboard with health tracking, and CSV/HTML report exports. The All Warnings inventory and navigation tools (Select in View, Isolate, Section Box) are always free, so you can browse and manually fix warnings without a licence.
Changelog
Initial Release
- Off-Axis correction for 17+ element types including sketch-based elements
- Detach invalid geometry joins, redundant separation lines, and wall attachments
- Overlapping wall detection with delete, solid-cut, and join strategies
- Split walls by level
- Duplicate Mark, Type Mark, and Number resolution with renumber and clear modes
- Identical instance detection and removal using union-find grouping
- Warning Dashboard with health score, charts, and trend tracking
- All Warnings inventory with search, sort, and navigation tools
- Colourise by deviation heatmap
- CSV and HTML report exports
- Single undo for all batch operations
- Support for Autodesk Revit 2022 through 2027